Showing posts with label Tutorial. Show all posts

Friday, 11 October 2013

Simple Crochet Scarf Tutorial


Scarves are one of the simplest things to make from crochet.  I’ve only used treble crochet and chains to make this one.  Like my granny square tutorial I am using a cotton yarn and a larger hook than recommended, both of these are just so that the stitches are easier for you to see.  I am also using different colours for each row so you can see it easier – you can either copy the colour changes or just work in a single colour.

Chain 25, this makes quite a narrow scarf, simply add more stitches if you want a wider scarf.

scarf1

Chain 3 extra stitches, this will count as the first treble in your row

scarf2

Treble into the fourth chain from the hook

scarf3

Treble into the next chain

scarf4

Treble into each stitch of the row

scarf5scarf6

Chain 3, and turn your work over, ready to work back down the row

scarf7scarf8

Have a quick look at the top of the stitches here, you should see a row of ‘V’ shapes all the way down. 

scarf9

When you are making the next row, be sure to put the hook under both sides of the ‘V’ shape.

Now you know what to look for, find the next treble in the row and make a treble into the top of it

scarf10

Continue to treble down the row until you reach the end. 

scarf11

Now the only tricky bit left is finding the last stitch to treble into. This is probably where you are going wrong if your rectangles start to get a little more triangle-shaped. At the start of the previous row you did 3 chains.  (the green stitch just above my thumb in this photo)

scarf12

Your last treble should be into the top of this chain, like this:

scarf13

If you’re not sure if you’ve done it or not, then count your stitches to make sure you have 25 (or more if your original chain row was longer)

scarf14

For the next row, as before, chain 3, turn your work over, and treble into each stitch of the row.
Keep going until your scarf is the length you want.  If you want to turn it into a snood/cowl then just sew the ends together.

scarf15

Hope that helps you get started.

Monday, 7 October 2013

How to Crochet a Granny Square

I thought today I’d add a post showing you how to make a granny square. The yarn I’ve used for this is a 100% cotton yarn which photographs nicely, and a 4mm hook (which is slightly larger than the yarn recommends) but which makes the stitches nice and clear to see.

I am assuming that you know how to make a slip stitch, and how to make chains and treble stitches (UK notation).

Round 1:  chain 6 stitches

granny1
then place your hook through the first chain you made,

granny2
and slip stitch (wrap the yarn around the hook and pull it through both loops on the hook)

granny3
Chain 3 - this counts as a treble

granny4
2 trebles into the centre ring - this is now your first group of trebles.  We will be making quite a few of these groups of trebles before the granny square is finished.

granny5
Chain 3 - this leaves a gap or "chain space"

granny6
3 trebles into the centre ring - yippee, the first corner is made.

granny7
chain 3, 3 trebles into centre ring - you've now made 2 corners, you're half way.

granny8
chain 3, 3 more trebles into centre ring

granny9
3 chain, and then slip stitch through the top of the 3 chain you made at the start of this round

granny10
Cast off this colour (if you are going to change colours), and admire your tiny little square.

granny11
Round 2: join your second colour by holding the end of the yarn at the back of the square (make sure you leave about 5-10 cm of yarn at the back of the square otherwise you risk it coming undone later), and pull a loop of your new colour through the large gap in one of the corners of the square.

granny12
Chain 3 - this counts as a treble

granny14
Treble 3, chain 3

granny15
Treble 3 more into the same space, and you have your first corner of this round.

granny16
Chain 2, then (treble 3, chain 3, treble 3) into the next large chain space

granny17
chain2, then (treble 3, chain 3, treble 3) into the next large chain space

granny18
chain 2, (treble 3, chain 3, treble 3) into the final large chain space.  Finish this round with a slip stitch into the top of the first chain you made of this round.  Cast off.

granny19
Round 3: Join new colour to one of the spaces on the middle of the sides, chain 3 and then complete 2 trebles in the same chain space.  As this is a side not a corner, we only need to make one group of trebles here.

granny20
Chain 2, move to the next chain space and (treble 3, chain 3, treble 3) into the same space to make a corner.

granny21
work around the edge of the square, in the same way.  Into each side space work 3 trebles followed by 2 chains to move to the next space, and into each corner chain space work (treble 3, chain 3, treble 3) followed by 2 chains to move to the next space.

granny22
You can either continue working around the square to make it larger, or make lots of small squares & stitch them together.

granny23
Make sure you run all of the ends in securely, as you don't want all of your hard work to unravel.

Hope that helps to unlock the mystery of the granny squares. Happy crocheting!

Sunday, 6 March 2011

Beaded Lampshade Tutorial

I’ve finally finished the beaded lampshade I was making for my bathroom, and thought I’d make a tutorial on how to do it.  I’ve used lots of photos so hopefully even if my descriptions don’t make a lot of sense, the photos will!
Here is the lampshade, proudly hung for all to see!
lampshadedone1First things first – get some lovely glass beads.  I got mine from Hobbycraft, and I bought 2 of the small pick and mix pots that you can buy in there.  I also used a pack of smaller glass beads to mix in with them.  You will also need some seed beads, thin wire, some jump rings and a lampshade frame.
lampshade3Lay the beads out in the pattern you want them.  I used alternating large and small beads.
Take a piece of wire, about 4” in length and create a loop about 1” from the end.  Wrap the tail of the wire around the other end, like in the photo here:
lampshade4Add a seed bead to the wire, then a small bead and then one of the larger beads, followed by a small bead and then another seed bead.  lampshade5
Create a loop and twist at the other end of the wire to complete your link.
lampshade6
To make the bottom link I looped the wire through a seed bead, then passed both wire ends up and through the large bead, and another seed bead, then I made a loop and twist on the top of the bead.
lampshade7Join your links together using jump rings.  I made 8 large chains, which used a total of 7 beads on each, and I also made 8 smaller chains of 5 beads.
Take your lampshade frame (I bought a cheap lampshade for £2 and cut it up to get the frame out).  Wire the chains around the frame by creating a twist of wire over the frame.
lampshade1 Continue to add them around the frame until you have used all of your chains.
lampshade2Position the chains where you want them and wrap the ends of the wire around the frame to hold them in place. 
Your lampshade is finished.
lampshadedone2
If you are making a bigger lampshade to the one I’ve made, you may have to shorten your chains as even though my shade is only small, it is quite heavy.  I guess you could use plastic beads, however I’m not sure how they would be if the bulb gets hot.  I’ve used mine with a low energy light bulb.
I’d love to see photos if anyone else makes one of these.
Sally
xxx

Thursday, 20 January 2011

Messenger Bag Tutorial

As promised, here is my tutorial for making a messenger bag.  Lots of photos, and hopefully directions you will be able to follow, but if I've not made anything clear, just leave me a comment and I'll try to help.

As a reminder, here is my bag:


To make this bag, you will need the following fabrics cut out.  I have labelled each side with a letter so that you can adjust this bag to whichever size you want.  I think perhaps you could also make it into a laptop bag by incorporating batting between the layers.  Side pockets are optional, pin them to the side pieces before you begin sewing the bag together.


I have used a heavy-weight fabric.  If you are using a light-weight fabric, you may need to use interfacing.

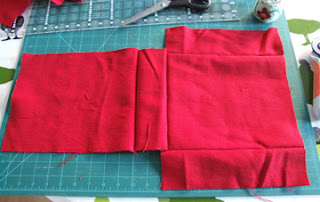
Sew the side pieces to the long edges of the front piece, right sides together.  Use whichever seam allowance you prefer, but stick to the same seam allowance through the whole pattern.  I used 1/2".  Sew bottom piece to short edge of front piece, right sides together.  Then sew the back piece to the other side of the bottom piece.  You should end up with a shape like this:


Now bring the back up and sew the sides of it to the side pieces.  This makes the basic bag shape.

Open out the bottom corners and sew across them (where the pins in this photo are).

Turn your bag in the right way.

Add applique to the front of the flap piece.  I made a flower and used free-motion embroidery to attach it to the bag in the top photo.  For the bag I made for the tutorial, I added a felt heart and blanket stitched it around the edge.  Let your imagination run wild here!

If you are using a fastener for your bag, add it to the centre of the flap lining piece now, about 2" up from the edge.  Place flap pieces together, right sides together, and sew around the edge - leave a 2" gap at the top of the flap to turn in the right way.


Turn it in the right way and then top stitch along the edges of the flap.

Add your chosen fastening to the front of your bag.  It must line up with where the flap will end up.  I pinned the flap in position to check where the fastening should end up.

Now make the lining of the bag by placing the front and back right sides together and sewing down the edges and then along the bottom of the pieces. 

Open out the corners and sew across them.

Leave the lining the way it is, and place it over the top of the bag (which should still be the right way out) and sew around the edges.  Again leave a 2" opening so you can turn it through. 


Pull it through the gap now & then top stitch around the edges of the bag. 

Place the flap in position on the back of the bag and stitch it down, make sure the fastenings join up.


Take your two small rectangles and hem both short edges with a small hem.  Fold long edges to centre and sew down each side. 
Enclose D-ring in the centre of the strip and sew both ends to the side of the bag.

Repeat for the other small rectangle.

Now make the strap.  Fold both short ends over a small amount and then fold the long edges to the centre of the strap.  Fold the whole thing in half length ways enclosing the raw edges inside.
Topstitch down each edge of the strap to make it look nice.

Put the handle through the D rings and sew it in place.  I used a slider to make the strap adjustable, but that is entirely optional. 

This is how my bag turned out.

Anyway well done to those people who made it through a marathon post.  Hope it helped show you how to make a messenger-type bag.

Enjoy

Sally
xxx