Showing posts with label Costume. Show all posts

Sunday, 17 October 2010

Pumpkin Costume Tutorial

As promised, here is the tutorial for the pumpkin costume I've made for the school Halloween party on Friday.  Have tried to use a lot of photos to illustrate what I've done - let me know if there is anything that isn't clear.
I made this pattern for my daughter who is 6, but the height of a 9 year old!  Adjust the length for the size you need.

I used 2 yards of orange fabric & the same of firm interfacing as my fabric was quite flimsy, and I wanted it to hold its shape better.  If your fabric is quite thick then you may not need to use this. I also bought 4 yards of orange ribbon to gather the top and bottom, but you could use elastic if you felt like it.

You will also need some black felt for the features and some fabric glue or bondaweb to attach them to the costume.

Make your paper pattern:

Cut a piece of paper 36” long  and 10” wide and fold it in half length ways to make a piece 36” x 5” (this is just to make sure both sides of the pattern match)
The top of each pumpkin piece needs to be 5” in width, so measure 2.5” from the fold and make a mark

For the bottom of the pumpkin shape, make a mark 3.5” from fold as the bottom needs to be 7”


Find the centre (18” from each end)  make a mark at the outside edge.

Draw a curved line from the top mark, touching the centre line & down to where you’ve marked at the bottom.  I hope you can see what I mean from this photo.

Cut out the pattern along the drawn lines.  Open out the pattern & you should be left with a sort of leaf shape, but with the top & bottom chopped off.


Use the pattern to cut out 6 of these shapes from your orange fabric, then cut 6 from interfacing if you are using it. 

Iron the interfacing onto the reverse of each fabric shape.

Place 2 fabric shapes together, right sides together and sew along one edge.  Open out.  Sew the next shape on in the same way and continue until  you have sewn all 6 side by side. 


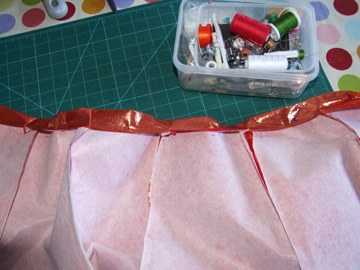
Do not sew the final seam yet.  Make a mark 2.5” down from each of the top panels & fold the top down to touch the mark.  Pin in place.  This is to make a channel for the ribbon to go through.


Sew along the bottom of the channel.  Repeat in the same way for the bottom of the pumpkin.
Using a safety pin, thread ribbon through the channels you’ve made.


Now sew the 2 ends of the pumpkin together to make a big circle – don’t sew through the channels though, just stop before them.  This will not notice when your child is wearing it.

Turn pumpkin in right way & try it on you/your child/your mother/your dog.  Mark where you need the arms to be & cut them out.  If your fabric frays, you will need to hem them or use a fray stopping liquid.  Luckily mine didn’t fray so I didn't bother.

Cut features out from black felt & glue, sew or bondaweb them to the front of the pumpkin.


Gather the top & bottom of the pumpkin by tying the ribbon. 


My daughter modelling the pumpkin costume:


I may yet pad it with cushions or add a wire inside it to make the costume puff out a bit more.  The bottom ribbon could also be tied around the waist to make more of a puffball shape:


If anyone makes one of these costumes, I'd love to see it.  Tomorrow I'm planning on making a hat to go with it.

Wednesday, 15 September 2010

Fairy Costume Tutorial - Part 2 - The Wings

Following on from yesterdays fairy costume tutorial, here is a photo of the fairy wings I've made. 

Unfortunately the photo is not a very good one, as I found it quite hard to get a decent picture of the wings, but hopefully it gives you the general idea.

To make them, you will need:  Some thickish garden wire, white netting, ribbon or coloured netting, sequins and fabric glue.

First of all I placed some string on the floor in the shape/size of wings I wanted.  This gives you an idea of how much wire you will need.  Each side of my wings are about 45 inches, so I needed about 8 feet of wire in all.  These wings are the right size for my daughter who is 6 (but is the height of an average 9 year old!!!)

Find the centre of the wire and taking each end at a time, wrap it around about 2 inches either side of the middle.  Repeat for the other end.  This should leave you with a big figure of 8 loop. 

Hopefully you can make out from this photo what I mean. 

The next step is to bend the frame into the shape of the wings.  You could also just as easily create dragon or bird wings by altering the shape of the frame.

I then cut a piece of white net large enough to go around the frame, with plenty to spare as I wanted the wings to have some gather in them.  Sew around the edge of the frame, gathering the excess net up towards the frame as you go.  You can then decorate it as I have done with sequins attached with fabric glue.  Tie the ribbon or coloured net around the middle of the wings, and let the ends hang loose.

To make them wearable, I used some extra coloured net to create two loops for my daughter to put her arms through and tied them in amongst the middle ribbon.

So all in all a quick, cheap and cheerful way of making a costume.

Tuesday, 14 September 2010

Fairy Costume Tutorial

As I've already mentioned our village carnival is coming up and our local school is taking part, so lots of the mums have been busily crafting and creating all manor of costumes.  My contribution was to make fairy costumes.  These are actually pretty simple to make, but they look really effective, so thought I'd share them with the world!

Fairy skirts first
This is what we are aiming for!  Firstly get a length of elastic, long enough to go round the waist of the would-be-fairy, and knot the ends together to make a big circle.    Next work out how long you want the skirt to be.  You will need to cut strips of net double this measurement, and about an inch or 2 in width.  I've used coloured net which was bought ready-cut from our local scrapstore, but I think this would look equally good with just white netting.

Fold each strip in half, and lay it under the elastic waistband.  Take the tail of the strip and pass it through the loop in the top of the strip so that it creates a knot around the elastic.  I should've taken a photo at this point but was rushing to get it done.  Have a look at this next photo which will hopefully help.
Continue knotting the net strips around the elastic until you've covered the whole of the elastic.  Try on the skirt and adjust the elastic as necessary.

You can also create a matching headband by plaiting long strands of the same net and knotting the two ends together.  Just like this one.
Along with a white t-shirt and a pair of leggings for modesty purposes, the main part of the costume is complete.  Tomorrow I'll take some photos of the wings I made and add them to this blog.  Hope this made some sense, would love to hear from you if you make these.