Monday 31 January 2011

Some New Bags & Gorgeous Fabric

Haven't been on here for a few days because Friday was my birthday, followed on Saturday by Daisy's 7th birthday - (Yep, she was a belated 30th birthday present for me!).  We had a great weekend celebrating with her roller-disco party on Saturday afternoon, and a celebratory trip to Hobbycraft on Sunday to spend the money both me and Daisy had been gifted.

I have however been busy crafting in the odd quiet moments.  Amongst other things I've made these two bags to put in my online shop:
The first one is made using some gorgeous fabric I got from Sewciety.  Here is a slightly closer view of the fabrics:
I've used the pattern from Homespun Threads that I used before (see here), and this time have also added a pocket at the front.  Again I've lined it with white cotton, and used a magnetic catch to fasten it.

The second bag is made from felt which I again bought from Sewciety. 
I've used needle felting plus a bit of sewing to put the bag together.  I am completely in love with the felted blanket pieces that Elisabeth sells, they're just so lovely to work with.
 
Anyway better go and start the bedtime routine!
 
Sally
xxx

Wednesday 26 January 2011

Andy Warhol Meets Hello Kitty

Don't ask me where my inspiration for this strange project came from - my mind and its often-weird imagination baffles me too!
A yet-to-be framed Pop Art Hello Kitty!  I've cut the shapes using a Sizzix die and then just sewed them onto felt squares.  I'll probably find another way of joining the squares as I don't like the fact you can see the stitching between them, but that's a job for another day. 

Sally
xxx

Sunday 23 January 2011

North Cottage Buttons

Had a really lovely day yesterday, really busy, but good.  Firstly I was at the Tisbury Country Market, where although I didn't manage to sell anything, I did buy some beautiful handmade buttons from North Cottage Buttons. 
They were a complete bargain at £1.50 a sheet.  They're made from clay and are washable too.  Sadly she doesn't yet have a website, (although I did point her in the direction of Misi), however if you are interested in buying any of them, you can contact her at baker_jaci(at)yahoo.co.uk - I also have her phone number which I will give you if you email me. 

Following the market I worked for an hour and a half at the carpet shop in Tisbury, then after a hasty lunch we went to Southampton to see Joseph and the Amazing Technicolor  Dreamcoat. 
It was fantastic.  The songs had us singing all the way home (sorry to my neighbours if you heard us).  We'd never taken the children to the theatre before, but they loved it too.  Daisy even told me she hoped she'd dream about Joseph and was quite disappointed this morning that she hadn't.

Back to reality today though - I've been painting the bathroom - Does that count as a craft?

Sally
xxx

Thursday 20 January 2011

Messenger Bag Tutorial

As promised, here is my tutorial for making a messenger bag.  Lots of photos, and hopefully directions you will be able to follow, but if I've not made anything clear, just leave me a comment and I'll try to help.

As a reminder, here is my bag:


To make this bag, you will need the following fabrics cut out.  I have labelled each side with a letter so that you can adjust this bag to whichever size you want.  I think perhaps you could also make it into a laptop bag by incorporating batting between the layers.  Side pockets are optional, pin them to the side pieces before you begin sewing the bag together.


I have used a heavy-weight fabric.  If you are using a light-weight fabric, you may need to use interfacing.

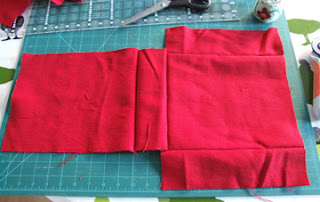
Sew the side pieces to the long edges of the front piece, right sides together.  Use whichever seam allowance you prefer, but stick to the same seam allowance through the whole pattern.  I used 1/2".  Sew bottom piece to short edge of front piece, right sides together.  Then sew the back piece to the other side of the bottom piece.  You should end up with a shape like this:


Now bring the back up and sew the sides of it to the side pieces.  This makes the basic bag shape.

Open out the bottom corners and sew across them (where the pins in this photo are).

Turn your bag in the right way.

Add applique to the front of the flap piece.  I made a flower and used free-motion embroidery to attach it to the bag in the top photo.  For the bag I made for the tutorial, I added a felt heart and blanket stitched it around the edge.  Let your imagination run wild here!

If you are using a fastener for your bag, add it to the centre of the flap lining piece now, about 2" up from the edge.  Place flap pieces together, right sides together, and sew around the edge - leave a 2" gap at the top of the flap to turn in the right way.


Turn it in the right way and then top stitch along the edges of the flap.

Add your chosen fastening to the front of your bag.  It must line up with where the flap will end up.  I pinned the flap in position to check where the fastening should end up.

Now make the lining of the bag by placing the front and back right sides together and sewing down the edges and then along the bottom of the pieces. 

Open out the corners and sew across them.

Leave the lining the way it is, and place it over the top of the bag (which should still be the right way out) and sew around the edges.  Again leave a 2" opening so you can turn it through. 


Pull it through the gap now & then top stitch around the edges of the bag. 

Place the flap in position on the back of the bag and stitch it down, make sure the fastenings join up.


Take your two small rectangles and hem both short edges with a small hem.  Fold long edges to centre and sew down each side. 
Enclose D-ring in the centre of the strip and sew both ends to the side of the bag.

Repeat for the other small rectangle.

Now make the strap.  Fold both short ends over a small amount and then fold the long edges to the centre of the strap.  Fold the whole thing in half length ways enclosing the raw edges inside.
Topstitch down each edge of the strap to make it look nice.

Put the handle through the D rings and sew it in place.  I used a slider to make the strap adjustable, but that is entirely optional. 

This is how my bag turned out.

Anyway well done to those people who made it through a marathon post.  Hope it helped show you how to make a messenger-type bag.

Enjoy

Sally
xxx


Wednesday 19 January 2011

Felt Purses

Apologies for the lack of messenger bag tutorial - life has just got in the way of crafting.  Nothing serious has happened, I just don't know where the last couple of days have disappeared to!  Rest assured the tutorial is in hand (ish) and I'm just waiting to take a few photos & then it'll be on here.

Back to what I have actually done.  I've made these couple of purses from some blanket squares that Elisabeth at Sewciety had felted, dyed and cut up. 

One is for the daughter of a friend, who is celebrating her 8th Birthday tomorrow, and the other is for ... me!  I think I prefer the shape of the flowery one, as I blanket stitched around the edge with wrong sides facing.  (Don't you just love the fact that felt doesn't fray).  The heart one I sewed inside out and turned through.

I've needle felted the shapes on the front of both, which leaves me with lots of little holes.  I actually kind of like them, but as I'm new to felting I'm not sure if there is a way to get rid of the holes.

Anyway more soon
Sally
xxx

Monday 17 January 2011

Messenger bag & aprons

A couple of weeks ago I was wandering around the charity shops, trying to find some wool jumpers to make felt from, when I came across these tea towels:
They only cost £3 or £4 for all of them, and as a bonus they were tied with some white cotton tapey-type thing (sorry don't know what its really called!).  I fell in love with the apple/pear print, and bought them.  Until recently I didn't know what I was going to do with them, but then inspiration struck - I made 2 aprons.

You can't really see the white tape on the green apron, but its the tape that the tea towels were tied together with.  I simply used 2 of the towels as they were and cut the apple/pear print into thirds to make big pockets and sewed it on.  Then I added tape to the top of the towel and voila - 2 simple aprons, with very little hemming required.

I thought afterwards that I could've made a full apron by sewing another tea towel on the top to make the bib piece, but that's a job for another day.

Today I've also made this messenger-type bag:
Am planning on making a simple pattern/tutorial for it, so watch out for that hopefully tomorrow.

Sally
xxx


Thursday 13 January 2011

Bags, Purses & Feltie things!

My daughter has finally remembered to bring her zipped purse home from school, and as I promised her I'd put a photo of it on my blog, here it is:
She decided to put her initials on this side of it and on the other side a heart:
Colour is not great on this photo, but the heart is just red wool roving, needle felted in, and the edges are needle felted together.  Thanks to Elisabeth at Sewciety for the idea.

My crafting month is still continuing with the following items:
I made these on Tuesday.  I used my sizzix cutter and dies to cut out the shapes and then needle felted them together.  I've used another layer of felt on the back of the cupcake to keep all the pieces together.  I may put a brooch backing on them, or attach them to a bag or pencil case, I'm not sure yet.

Wednesday 12th's offering:
An apple purse made from fabric I got from FabricRehab.  The inside is lined with a lovely pink retro fabric that I bought from Sewciety.  Sadly I didn't take a photo of the inside, but I'm sure I'll use the rest of the fabric on something else, so I'll take a photo then.

Today I got organised and made another bag from a pattern at Homespun Threads.  This time I made the Ariel bag, from fabric I had in my stash.
This is full size from the pattern and it makes a lovely big bag.  I didn't have the hook that the original pattern called for so I just added a magnetic clasp to the underside of the flap.  I'm thinking of adding a large sparkly button or brooch to the front of the flap, just to break the pattern up a bit, but I'm not sure if that will look right.  Anyone got any ideas?


Sally
xxx

Monday 10 January 2011

A New Bag

Today the children were all at school (hooray & yippee), so I had a bit of time to do some serious sewing.  A couple of weeks ago I downloaded some patterns from Homespun Threads, who was kindly giving them away for free.  I particularly loved the pattern for the Maddie Handbag, and here is my version of it:
It has ties on the side to tighten the top, and a magnetic clasp to secure the top.
I did change the size of the bag slightly as I only had a fat quarter of the outer fabric, and the pattern called for 1/2 yard.  It was quite easy to change as the bag is made from rectangles of fabric, and by slightly changing the height of the bag, and skipping the pockets, I managed to fit it onto the FQ.  I love this floral fabric, its from Fabric Rehab, and better still I found it in their sale section!

I was also going to show a photo of a purse my daughter made from felt, but unfortunately she took it to school today to show her teacher and has left it there (isn't that always the way!) So I guess that will have to wait for another day to make its debut.

Sally
xxx

PS, Elisabeth (aka Lisanne) at Sewciety has started a new blog if anyone would like to say hello, you can find it here


Sunday 9 January 2011

Lots more Crafts

More entries for my crafting Diary:

6th Jan - Having had a bit of a mad making of felt balls and small pieces of felt, I wondered what to do with them - this is what I came up with:
Not a brilliant photo, it was quite hard to get the lighting right as I've hung it right next to a window!  Here are a  couple of closer photos:
(Probably should've cut the extra bit of wool off at the bottom!)
I've just used a long piece of wool & knotted it just below where I wanted each ball or felt piece to go & then using a very strong needle, pushed each piece onto the wool. 

7th Jan - Another pincushion to add to my collection!
 I intended this one to be a cupcake, but sadly I couldn't get the shape right, so its ended up as a teapot!

8th Jan - Yet another pincushion (do you think I'm obsessed by pincushions now?)
This time I've made the ball shape & drawn round it onto a sheet of ready made felt.  Then I cut out the inside petals & needle felted them half way up the ball shape.  I repeated this for the outside petals but this time only felted them a quarter of the way up the ball shape.  This is how it turned out:

Slightly wonky, but not bad for my first attempt.

9th Jan - Today I'd decided to rest from felting and have put together some patchwork.  I think I'm going to make it into a new PE bag for my daughter, as then she'll never bring home the wrong bag!
I used a jelly roll I bought from FabricLand in Salisbury, joined the long strips and then cut and reassembled them into smaller squares.

Wonder if I can make something every day during January?

Sally
xxx

Wednesday 5 January 2011

Kirstie is to blame for the mess in my house!

Today I tried a slightly different craft - inspired by Kirstie Allsop on Kirstie's Homemade Home which I recorded before Christmas and have only now got round to watching.  I wish she wouldn't try all these crafts as I get inspired to have a go & then my housekeeping goes right down to zero!

Anyway on the program I watched, she did some sewing machine embroidery, and this is my attempt at doing it.  I drew the picture, traced over it and then sewed through the tracing paper & onto the fabric.  I then painted it with some fabric paint I had. 


Not sure what I'm going to do with it yet, but I like the effect - makes my childish drawings look halfway reasonable!  Maybe tomorrow I might try the same thing, but by appliqueing fabric instead of painting it.  Yet another day with no housework - thanks Kirstie.

Sally
xxx

Tuesday 4 January 2011

NieNie Skirt

As promised more detail about the skirt I've been making for Elisabeth at Sewciety.  I've finally finished it and here it is, beautifully modelled by my daughter:


And a closer look at it:


It's made with lots of layers of ruffles and although at first it looks daunting to make, it went together pretty easily.  It's probably not a pattern for a beginner, as a bit of knowledge is assumed, and it is quite time-consuming to make, however the results are well worth the time taken.  If you've got a special occasion in mind then I would say go for it, just think how proud you'll feel when its finished and you can say that you made it!

The pattern is called the NieNie Skirt and is available on Sewciety's website.  The Art Gallery fabric I've used is also from Sewciety, and is directly imported from USA.  It is great to work with and is perfect for dressmaking as it falls beautifully.  The site also has some unusual fabric which is imported from South Africa, called Shwe Shwe, have a look and see what you think.

Finally, when you put on a skirt like this, what should you do:


why twirl of course!

Sally
xxx

Monday 3 January 2011

2011 - My year of crafting

My resolution for 2011 - to do as much crafting as is possible with 3 children & 2 jobs!  So to that end, even though I've had friends staying for the past couple of days, I've managed to do a little bit of crafting each day.

1st Jan
Spent half an hour working on a gorgeous skirt I'm making for Elisabeth at Sewciety.  I will post more about this hopefully tomorrow when I've finished making it.

2nd Jan
More felt pin cushions:


I think I like the yellow one best, very chirpy and cheerful, and the best part is that they don't take too long to make.
3rd Jan
Today - A little bit more skirt making, and I also taught my friends daughter how to make felt balls, which she really enjoyed.

Just small amounts of crafting, but its lovely to look back each evening and know that I've accomplished something.  This is one new years resolution I really want to keep.

Sally
xxx